Tectonic from CoreOS is an enterprise-grade Kubernetes solution which simplifies management operation of a k8s environment by leveraging CoreOS, fleet, Rkt and Flannel. In this article we’ll manually build a cluster of three CoreOS nodes on top of VMware Fusion to see how all of this fits together.
Introduction
Kubernetes is already available, ready to consume as a Service from Google, Platform9 where you’ll quickly be up and running. They are also some automation tooling, like Ansible Playbooks, SaltStack or bootKube, specifically built to rapidly deploy a cluster with all the required components.
Before automating the deployment, I’m curious to do it step by step, to get a really good understanding of the internals. In this guide, heavily inspired by the CoreOS one, we’ll be using components of Kubernetes itself, the kubelet, to spin-out the rest of the infrastructure, more containers. I find it pretty elegant that Kubernetes can host itself, by the way Kubernetes community is working on improving this experience even further.
So lets jumstart our Kubernetes cluster by preparing 3 VMs running CoreOS and configure them as a 3-node etcd cluster.
Beware, 5-node is recommended for production environment, or loosing one to maintenance will put you at risk if anything else goes wrong.
CoreOS deployment on VMware Fusion
Start by downloading the latest stable CoreOS VMware image:
curl -LO https://stable.release.core-os.net/amd64-usr/current/coreos_production_vmware_ova.ova
As we’ve seen in our About Kubernetes article, etcd is a crucial component of k8s. So lets first create a etcd cluster, to do so we need to generate a new cluster token which will be used for node discovery. Three nodes should be enough for our demo environment.
Generate a new cluster token using the URL below, update the size if you want more nodes. The size specified here will be used to determine if all members have joined the cluster. After bootstrapping the cluster can grow or shrink.
curl -w "\n" 'https://discovery.etcd.io/new?size=3'
To easily configure each node, we’ll be using a cloud-config file, inspired by the cloud-init project. Lets create this file
# vi user_data
The content should be similar to the following, update below your ssh-key, token, IP addresses …
#cloud-config

hostname: kube-01
ssh_authorized_keys:
  - "ssh-rsa AAAAB3NzaC1yc........"

coreos:
  etcd2:
    discovery: https://discovery.etcd.io/<token>
    listen-client-urls: http://12.0.0.11:2379,http://127.0.0.1:2379
    initial-advertise-peer-urls: http://12.0.0.11:2380
    listen-peer-urls: http://12.0.0.11:2380

 units:
   - name: 00-enostar.network
     runtime: true
     content: |
       [Match]
       Name=en*

       [Network]
       Address=12.0.0.11/24
       Gateway=12.0.0.2
       DNS=192.168.1.221

   - name: etcd2.service
     command: start

   - name: fleet.service
     command: start
Above we configure CoreOS to start etcd and fleet which will be used to build a HA cluster.
Copy and Paste it to CoreOS online validator to check for any syntax error
Now Create a config-drive disk to automatically configure your CoreOS node at Boot time, on macOS
mkdir -p ~/new-drive/openstack/latest
cp user_data ~/new-drive/openstack/latest/user_data
hdiutil makehybrid -iso -joliet -default-volume-name config-2 -o configdrive-1.iso ~/new-drive
rm -r ~/new-drive
For Linux just replace hdiutil command line by
mkisofs -R -V config-2 -o configdrive.iso /tmp/new-drive
Everything is now ready to open the OVA file downloaded earlier. From VMware Fusion select
File > Import...
You can then select the previously downloaded OVA file, click Retry if you’ve been asked, you should then see
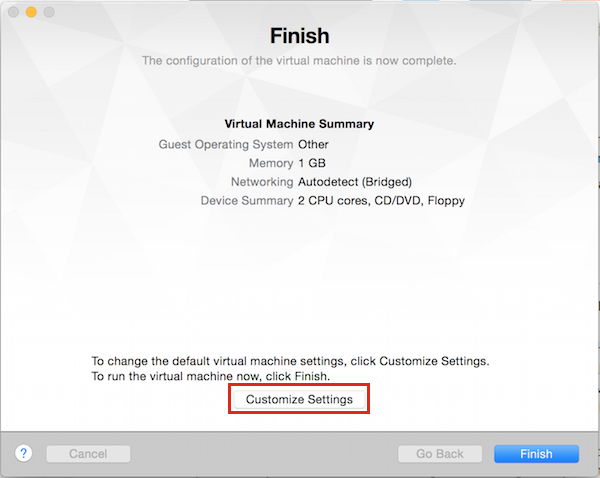
Click on Customize settings and connect the previously created Config Drive ISO

Note: Each CoreOS node will require its own Config Drive ISO, its used upon each reboot, do not disconnect it afterwards.
Depending on your available resource, you can also scale-up CPU and Memory.
Power-on your CoreOS VM and ssh in
ssh core@12.0.0.11
Note: If you cannot login, you can autologin from GRUB. Reboot your node and Press e at GRUB prompt to add coreos.autologin as boot parameter and Press F10.
You can then look at cloudinit logs
journalctl _EXE=/usr/bin/coreos-cloudinit
Verify etcd status
systemctl status etcd2
If there is anything wrong above, check etcd logs
journalctl -f -t etcd2
If etcd isn’t running you can verify its corresponding systemd runtime unit
cat /run/systemd/system/etcd2.service.d/20-cloudinit.conf
And finally you can restart it
sudo systemctl restart etcd2
Note: Internet Access and DNS resolution is required for the etcd cluster bootstrapping, it access the discovery URL at discovery.etcd.io. Refer to the docs for offline bootstrapping. Be sure to change the token if you need to start the bootstrapping process from scratch.
Repeat a similar process for two more nodes and run etcdctl to check the cluster-wide health information. It will contact all the members of the cluster and collect the health information for you.
etcdctl cluster-health
member 1b0edb1b9b4ea4c5 is healthy: got healthy result from http://localhost:2379
member a10ff4050999b675 is healthy: got healthy result from http://localhost:2379
member b48e6630d8c3f3cd is healthy: got healthy result from http://localhost:2379
Check the member list
etcdctl member list
1b0edb1b9b4ea4c5: name=12f3c00...ab46874fe peerURLs=http://12.0.0.13:2380 clientURLs=http://localhost:2379,http://localhost:4001 isLeader=false
a10ff4050999b675: name=65eaf4f...9a4a74f3a9 peerURLs=http://12.0.0.12:2380 clientURLs=http://localhost:2379,http://localhost:4001 isLeader=false
b48e6630d8c3f3cd: name=b55f820...7bc36a9 peerURLs=http://12.0.0.11:2380 clientURLs=http://localhost:2379,http://localhost:4001 isLeader=true
Congrat, you have a fully operational 3-node etcd cluster and a leader elected.
TLS Assests
You enter the boring part, which by itself justify next time to automate all of this, but it’s a good learning experience. So lets continue.
Kubernetes will validate client using certificate authentication, so we need to put in place a Certificate Authority and generate the proper credentials.
Cluster Root CA
On kube-01 node, create a new Certificate authority, used to sign our certificates
openssl genrsa -out ca-key.pem 2048
openssl req -x509 -new -nodes -key ca-key.pem -days 10000 -out ca.pem -subj "/CN=kube-ca"
OpenSSL Config k8s
Prepare the following configuration file
vi openssl.cnf

[req]
req_extensions = v3_req
distinguished_name = req_distinguished_name
[req_distinguished_name]
[ v3_req ]
basicConstraints = CA:FALSE
keyUsage = nonRepudiation, digitalSignature, keyEncipherment
subjectAltName = @alt_names
[alt_names]
DNS.1 = kubernetes
DNS.2 = kubernetes.default
DNS.3 = kubernetes.default.svc
DNS.4 = kubernetes.default.svc.cluster.local
IP.1 = 13.0.0.1
IP.2 = 12.0.0.11
13.0.0.1 correspond to the first IP of the CIDR network to use for service cluster VIP. [K8S_SERVICE_IP]
12.0.0.11 is the IP of our first CoreOS node, if we had multiple k8s master node we could put here a Load Balancer Virtual IP [MASTER_HOST]
API Server Keypair
Now create a Keypair for your API Server
openssl genrsa -out apiserver-key.pem 2048
openssl req -new -key apiserver-key.pem -out apiserver.csr -subj "/CN=kube-apiserver" -config openssl.cnf
openssl x509 -req -in apiserver.csr -CA ca.pem -CAkey ca-key.pem -CAcreateserial -out apiserver.pem -days 365 -extensions v3_req -extfile openssl.cnf
Workers Keypairs
For security concerns, each worker node will be using its own TLS Certificate. Create the following configuration file for OpenSSL
vi worker-openssl.cnf

[req]
req_extensions = v3_req
distinguished_name = req_distinguished_name
[req_distinguished_name]
[ v3_req ]
basicConstraints = CA:FALSE
keyUsage = nonRepudiation, digitalSignature, keyEncipherment
subjectAltName = @alt_names
[alt_names]
IP.1 = $ENV::WORKER_IP
Now generates kube-02 Worker Keypair
openssl genrsa -out kube-02-worker-key.pem 2048
WORKER_IP=12.0.0.12 openssl req -new -key kube-02-worker-key.pem -out kube-02-worker.csr -subj "/CN=kube-02" -config worker-openssl.cnf
WORKER_IP=12.0.0.12 openssl x509 -req -in kube-02-worker.csr -CA ca.pem -CAkey ca-key.pem -CAcreateserial -out kube-02-worker.pem -days 365 -extensions v3_req -extfile worker-openssl.cnf
Repeat the process above for kube-03, but replace 12.0.0.12 by 12.0.0.13 and kube-02 by kube-03.
Cluster Admin Keypair
Generate the last keypair like this
openssl genrsa -out admin-key.pem 2048
openssl req -new -key admin-key.pem -out admin.csr -subj "/CN=kube-admin"
openssl x509 -req -in admin.csr -CA ca.pem -CAkey ca-key.pem -CAcreateserial -out admin.pem -days 365
Kubernetes Master Node
TLS Assets
We are now ready to transform kube-01 node to a single Kubernetes Master Node. First put in place the TLS keys at their expected location.
On kube-01 do the following
mkdir -p /etc/kubernetes/ssl
cp /home/core/ca.pem /etc/kubernetes/ssl
cp /home/core/apiserver.pem /etc/kubernetes/ssl
cp /home/core/apiserver-key.pem /etc/kubernetes/ssl
Set proper permissions
sudo chmod 600 /etc/kubernetes/ssl/*-key.pem
sudo chown root:root /etc/kubernetes/ssl/*-key.pem
Flannel
Flannel provides a software defined overlay network for routing traffic to/from pods. Lets configure it
mkdir /etc/flannel
vi /etc/flannel/options.env

FLANNELD_IFACE=12.0.0.11
FLANNELD_ETCD_ENDPOINTS=http://12.0.0.11:2379,http://12.0.0.12:2379,http://12.0.0.13:2379
Above we’ve put first the Master node IP address and then all etcd node IP addresses.
Now create the following systemd drop-in, its a method for overriding parameters of a systemd unit. In this case it will allow to use the above configuration when Flannel starts.
mkdir /etc/systemd/system/flanneld.service.d/
vi /etc/systemd/system/flanneld.service.d/40-ExecStartPre-symlink.conf

[Service]
ExecStartPre=/usr/bin/ln -sf /etc/flannel/options.env /run/flannel/options.env
Docker
We’ll now use the same drop-in mechanism to make sure Docker is configured to use Flannel, which is masterless. To achieve that goal its only necessary to make sure flanneld is already running when Docker starts.
mkdir /etc/systemd/system/docker.service.d/
vi /etc/systemd/system/docker.service.d/40-flannel.conf

[Unit]
Requires=flanneld.service
After=flanneld.service
Kubelet
Kubelet is an agent running on each node that start and stops pods and do other machine related tasks.
Create the following Kubelet Unit
vi /etc/systemd/system/kubelet.service

[Service]
ExecStartPre=/usr/bin/mkdir -p /etc/kubernetes/manifests

Environment=KUBELET_VERSION=v1.2.4_coreos.cni.1
ExecStart=/usr/lib/coreos/kubelet-wrapper \
	--api-servers=http://127.0.0.1:8080 \
	--network-plugin-dir=/etc/kubernetes/cni/net.d \
	--network-plugin=cni \
	--register-schedulable=false \
	--allow-privileged=true \
	--config=/etc/kubernetes/manifests \
	--hostname-override=12.0.0.11 \
	--cluster-dns=13.0.0.10 \
	--cluster-domain=cluster.local
Restart=always
RestartSec=10
[Install]
WantedBy=multi-user.target
v1.2.4_coreos.cni.1 is the latest Hyperkube release which includes Container Networking Interface (CNI), required for Calico. You can check on quay.io if you want a newer version.
--register-schedulable=false to make sure no Pods will be running on our master node
--config=/etc/kubernetes/manifests watch directory for pods to run
12.0.0.11 this node public routable IP
13.0.0.10 is the DNS_SERVICE_IP, it should be in the SERVICE_IP_RANGE which is 13.0.0.0/24 but cannot be the first IP. The same IP must be configured on all worker nodes to enable DNS Service Discovery.
API Server Pod
Now that we have our nice kubelet ready, we can leverage it to deploy our stateless k8s API Server. All we need to do is place our Pod manifest in the configured watch directory. The kubelet will make sure it stays running.
Create the following Pod manifest
mkdir -p /etc/kubernetes/manifests
vi /etc/kubernetes/manifests/kube-apiserver.yaml

apiVersion: v2
kind: Pod
metadata:
  name: kube-apiserver
  namespace: kube-system
spec:
  hostNetwork: true
  containers:
  - name: kube-apiserver
    image: quay.io/coreos/hyperkube:v1.2.4_coreos.1
    command:
    - /hyperkube
   - apiserver
   - --bind-address=0.0.0.0
   - --etcd-servers=http://12.0.0.11:2379,http://12.0.0.12:2379,http://12.0.0.13:2379
   - --allow-privileged=true
   - --service-cluster-ip-range=13.0.0.0/24
   - --secure-port=443
   - --advertise-address=12.0.0.11
   - --admission-control=NamespaceLifecycle,LimitRanger,ServiceAccount,ResourceQuota
   - --tls-cert-file=/etc/kubernetes/ssl/apiserver.pem
   - --tls-private-key-file=/etc/kubernetes/ssl/apiserver-key.pem
   - --client-ca-file=/etc/kubernetes/ssl/ca.pem
   - --service-account-key-file=/etc/kubernetes/ssl/apiserver-key.pem
   - --runtime-config=extensions/v1beta1=true,extensions/v1beta1/thirdpartyresources=true
   ports:
   - containerPort: 443
     hostPort: 443
     name: https
   - containerPort: 8080
     hostPort: 8080
     name: local
   volumeMounts:
   - mountPath: /etc/kubernetes/ssl
     name: ssl-certs-kubernetes
     readOnly: true
   - mountPath: /etc/ssl/certs
     name: ssl-certs-host
     readOnly: true
 volumes:
 - hostPath:
     path: /etc/kubernetes/ssl
   name: ssl-certs-kubernetes
 - hostPath:
     path: /usr/share/ca-certificates
   name: ssl-certs-host
http://12.0.0.11:2379,http://12.0.0.12:2379,http://12.0.0.13:2379 are ETCD_ENDPOINTS, where etcd is running.
13.0.0.0/24 is the SERVICE_IP_RANGE, this range isn’t accessible from the network, it’s only locally significant to the host. Traffic from a container destinated to such a service address will be NATed when traversing the kube-proxy. The proxy will then load balance to one of the matching container for the destinated service, so the destination IP on the wire will be one within the Flannel Range IP, here on the 14.0.0./24 network.
12.0.0.11 is this node routable IP Address
kube-proxy Pod
The kube-proxy is responsible for directing traffic destined for specific services and pods to the correct location
Lets use the same mechanism for our kube-proxy Pod by creating the following Manifest
vi /etc/kubernetes/manifests/kube-proxy.yaml

apiVersion: v1
kind: Pod
metadata:
  name: kube-proxy
  namespace: kube-system
spec:
  hostNetwork: true
  containers:
  - name: kube-proxy
    image: quay.io/coreos/hyperkube:v1.2.4_coreos.1
    command:
    - /hyperkube
    - proxy
    - --master=http://127.0.0.1:8080
    - --proxy-mode=iptables
    securityContext:
      privileged: true
    volumeMounts:
    - mountPath: /etc/ssl/certs
      name: ssl-certs-host
      readOnly: true
  volumes:
  - hostPath:
      path: /usr/share/ca-certificates
    name: ssl-certs-host
kube-controller-manager Pod
And now create a manifest for our kube-controller which is responsible for reconciling any required actions based on changes to Replication Controllers.
vi /etc/kubernetes/manifests/kube-controller-manager.yaml

apiVersion: v1
kind: Pod
metadata:
  name: kube-controller-manager
  namespace: kube-system
spec:
  hostNetwork: true
  containers:
  - name: kube-controller-manager
    image: quay.io/coreos/hyperkube:v1.2.4_coreos.1
    command:
    - /hyperkube
    - controller-manager
    - --master=http://127.0.0.1:8080
    - --leader-elect=true
    - --service-account-private-key-file=/etc/kubernetes/ssl/apiserver-key.pem
    - --root-ca-file=/etc/kubernetes/ssl/ca.pem
    livenessProbe:
      httpGet:
        host: 127.0.0.1
        path: /healthz
        port: 10252
      initialDelaySeconds: 15
      timeoutSeconds: 1
    volumeMounts:
    - mountPath: /etc/kubernetes/ssl
      name: ssl-certs-kubernetes
      readOnly: true
    - mountPath: /etc/ssl/certs
      name: ssl-certs-host
      readOnly: true
  volumes:
  - hostPath:
      path: /etc/kubernetes/ssl
    name: ssl-certs-kubernetes
  - hostPath:
      path: /usr/share/ca-certificates
    name: ssl-certs-host
kube-scheduler Pod
Same for the scheduler
vi /etc/kubernetes/manifests/kube-scheduler.yaml

apiVersion: v1
kind: Pod
metadata:
  name: kube-scheduler
  namespace: kube-system
spec:
  hostNetwork: true
  containers:
  - name: kube-scheduler
    image: quay.io/coreos/hyperkube:v1.2.4_coreos.1
    command:
    - /hyperkube
    - scheduler
    - --master=http://127.0.0.1:8080
    - --leader-elect=true
    livenessProbe:
      httpGet:
        host: 127.0.0.1
        path: /healthz
        port: 10251
      initialDelaySeconds: 15
      timeoutSeconds: 1
Calico Node Container
Calico provides network policy to our cluster. It will run on all hosts to connect containers to the flannel overlay network and enforce network policy created using k8s policy API. It restrict Pod to only talk to authorized resources only.
Create the following Unit
vi /etc/systemd/system/calico-node.service

[Unit]
Description=Calico per-host agent
Requires=network-online.target
After=network-online.target

[Service]
Slice=machine.slice
Environment=CALICO_DISABLE_FILE_LOGGING=true
Environment=HOSTNAME=12.0.0.11
Environment=IP=12.0.0.11
Environment=FELIX_FELIXHOSTNAME=12.0.0.11
Environment=CALICO_NETWORKING=false
Environment=NO_DEFAULT_POOLS=true
Environment=ETCD_ENDPOINTS=http://12.0.0.11:2379,http://12.0.0.12:2379,http://12.0.0.13:2379
ExecStart=/usr/bin/rkt run --inherit-env --stage1-from-dir=stage1-fly.aci \
--volume=modules,kind=host,source=/lib/modules,readOnly=false \
--mount=volume=modules,target=/lib/modules \
--trust-keys-from-https quay.io/calico/node:v0.19.0

KillMode=mixed
Restart=always
TimeoutStartSec=0

[Install]
WantedBy=multi-user.target
12.0.0.11 this node routable IP Address
http://12.0.0.11:2379,http://12.0.0.12:2379,http://12.0.0.13:2379 are ETCD_ENDPOITNS
policy-agent Pod
We are almost done on the master node. This agent monitors the API for changes related to network policies and configures Calico to implement them.
vi /etc/kubernetes/manifests/policy-agent.yaml

apiVersion: v1
kind: Pod
metadata:
  name: calico-policy-agent
  namespace: calico-system
spec:
  hostNetwork: true
  containers:
    # The Calico policy agent.
    - name: k8s-policy-agent
      image: calico/k8s-policy-agent:v0.1.4
      env:
        - name: ETCD_ENDPOINTS
          value: "http://12.0.0.11:2379,http://12.0.0.12:2379,http://12.0.0.13:2379"
        - name: K8S_API
          value: "http://127.0.0.1:8080"
        - name: LEADER_ELECTION
          value: "true"
    # Leader election container used by the policy agent.
    - name: leader-elector
      image: quay.io/calico/leader-elector:v0.1.0
      imagePullPolicy: IfNotPresent
      args:
        - "--election=calico-policy-election"
        - "--election-namespace=calico-system"
        - "--http=127.0.0.1:4040"
http://12.0.0.11:2379,http://12.0.0.12:2379,http://12.0.0.13:2379 are ETCD_ENDPOITNS
CNI Config
Lets create a kubelet CNI configuration file to instruct it to call the flannel plugin but then to delegate control to the Calico plugin.
mkdir -p /etc/kubernetes/cni/net.d/
vi /etc/kubernetes/cni/net.d/10-calico.conf

{
    "name": "calico",
    "type": "flannel",
    "delegate": {
        "type": "calico",
        "etcd_endpoints": "http://12.0.0.11:2379,http://12.0.0.12:2379,http://12.0.0.13:2379",
        "log_level": "none",
        "log_level_stderr": "info",
        "hostname": "${12.0.0.10}",
        "policy": {
            "type": "k8s",
            "k8s_api_root": "http://127.0.0.1:8080/api/v1/"
        }
    }
}
http://12.0.0.11:2379,http://12.0.0.12:2379,http://12.0.0.13:2379 are ETCD_ENDPOINTS
12.0.0.10 this node routable IP Address
Start Services
We are now ready to start all of the master components. Tell systemd that you’ve changed units on disk for it to rescan everything
sudo systemctl daemon-reload
Configure flannel Pod network IP range, it uses etcd and will encapsulate traffic using VXLAN.
curl -X PUT -d "value={\"Network\":\"14.0.0.0/16\",\"Backend\":{\"Type\":\"vxlan\"}}" "http://12.0.0.11:2379/v2/keys/coreos.com/network/config"
14.0.0.0/16 The CIDR network to use for pod IPs. Each pod launched in the cluster will be assigned an IP out of this range. This network must be routable between all hosts in the cluster. In a default installation, the flannel overlay network will provide routing to this network.
12.0.0.11 IP address of one of our etcd node
Start Kubelet, which will also start the Pod manifest for the API server, the controller manager, proxy and scheduler
sudo systemctl start kubelet
Ensure it will be started after a reboot
sudo systemctl enable kubelet
Start Calico
sudo systemctl start calico-node
Ensure it will be start after a reboot
sudo systemctl enable calico-node
Check API is up
You can observe the downloading process
sudo systemctl status kubelet.service
Before going to the next step wait until the k8s API respond, try from the k8s master node
curl http://127.0.0.1:8080/version
You should get
{
"major": "1",
"minor": "2",
"gitVersion": "v1.2.4+coreos.1",
"gitCommit": "7f80f816ee1a23c26647aee8aecd32f0b21df754",
"gitTreeState": "clean"
}
Kubernetes namespaces
For other hosts in the cluster to discover Kubernetes Control Plane pods, lets create a corresponding namespace
curl -H "Content-Type: application/json" -XPOST -d'{"apiVersion":"v1","kind":"Namespace","metadata":{"name":"kube-system"}}' "http://127.0.0.1:8080/api/v1/namespaces"
Create also a namespace for Calico policy-agent
curl -H "Content-Type: application/json" -XPOST -d'{"apiVersion":"v1","kind":"Namespace","metadata":{"name":"calico-system"}}' "http://127.0.0.1:8080/api/v1/namespaces"
Enable network policy API
To enable Network policy in Kubernetes which is currently implemented as a 3rd party resource, run
curl -H "Content-Type: application/json" -XPOST http://127.0.0.1:8080/apis/extensions/v1beta1/namespaces/default/thirdpartyresources --   data-binary @- <<BODY
{
  "kind": "ThirdPartyResource",
  "apiVersion": "extensions/v1beta1",
  "metadata": {
    "name": "network-policy.net.alpha.kubernetes.io"
  },
  "description": "Specification for a network isolation policy",
  "versions": [
    {
      "name": "v1alpha1"
    }
  ]
}
BODY
Kubernetes Worker Nodes
Almost there, we can now switch to our worker nodes.
TLS Assets
Place the TLS keypairs generated previously in the following directory. For each node.
scp ca.pem core12.0.0.12:/tmp
scp kube-02*.pem core12.0.0.12:/tmp
ssh core@12.0.0.12
mkdir -p /etc/kubernetes/ssl/
mv /tmp/kube-02-worker* /tmp/ca.pem /etc/kubernetes/ssl
sudo chmod 600 /etc/kubernetes/ssl/*-key.pem
sudo chown root:root /etc/kubernetes/ssl/*-key.pem
cd /etc/kubernetes/ssl/
sudo ln -s kube-02-worker.pem worker.pem
sudo ln -s kube-02-worker-key.pem worker-key.pem
Networking
Same as for the master node, do the following for each of your worker nodes.
mkdir /etc/flannel
vi /etc/flannel/options.env

FLANNELD_IFACE=12.0.0.12
FLANNELD_ETCD_ENDPOINTS=http://12.0.0.11:2379,http://12.0.0.12:2379,http://12.0.0.13:2379
http://12.0.0.11:2379,http://12.0.0.12:2379,http://12.0.0.13:2379 ETCD_ENDPOINTS
12.0.0.10 this node routable IP Address
Now create the systemd drop-in which will use the above configuration when flannel starts
mkdir /etc/systemd/system/flanneld.service.d/
vi /etc/systemd/system/flanneld.service.d/40-ExecStartPre-symlink.conf

[Service]
ExecStartPre=/usr/bin/ln -sf /etc/flannel/options.env /run/flannel/options.env
Flannel isn’t yet started but you can come back here later to check its running configuration with
cat /run/flannel/subnet.env
Docker
We need flanneld to be running prior to Docker, do the following on each worker node
mkdir  /etc/systemd/system/docker.service.d
vi /etc/systemd/system/docker.service.d/40-flannel.conf

[Unit]
Requires=flanneld.service
After=flanneld.service
kubelet unit
Create the following Unit in each worker node
vi /etc/systemd/system/kubelet.service

[Service]
ExecStartPre=/usr/bin/mkdir -p /etc/kubernetes/manifests

Environment=KUBELET_VERSION=v1.2.4_coreos.cni.1
ExecStart=/usr/lib/coreos/kubelet-wrapper \
  --api-servers=https://12.0.0.11 \
  --network-plugin-dir=/etc/kubernetes/cni/net.d \
  --network-plugin=calico \
  --register-node=true \
  --allow-privileged=true \
  --config=/etc/kubernetes/manifests \
  --hostname-override=12.0.0.12 \
  --cluster-dns=13.0.0.10 \
  --cluster-domain=cluster.local \
  --kubeconfig=/etc/kubernetes/worker-kubeconfig.yaml \
  --tls-cert-file=/etc/kubernetes/ssl/worker.pem \
  --tls-private-key-file=/etc/kubernetes/ssl/worker-key.pem
Restart=always
RestartSec=10
[Install]
WantedBy=multi-user.target
v1.2.4_coreos.cni.1 hyperkube version
12.0.0.11 Master Host IP address
12.0.0.12 Node routable IP address
13.0.0.10 DNS_SERVICE_IP
CNI Config
For each worker node
mkdir -p /etc/kubernetes/cni/net.d/
vi /etc/kubernetes/cni/net.d/10-calico.conf

{
    "name": "calico",
    "type": "flannel",
    "delegate": {
        "type": "calico",
        "etcd_endpoints": "http://12.0.0.11:2379,http://12.0.0.12:2379,http://12.0.0.13:2379",
        "log_level": "none",
        "log_level_stderr": "info",
        "hostname": "12.0.0.12",
        "policy": {
            "type": "k8s",
            "k8s_api_root": "https://12.0.0.11:443/api/v1/",
            "k8s_client_key": "/etc/kubernetes/ssl/worker-key.pem",
            "k8s_client_certificate": "/etc/kubernetes/ssl/worker.pem"
        }
    }
}
http://12.0.0.11:2379,http://12.0.0.12:2379,http://12.0.0.13:2379 ETCD_ENDPOINTS
12.0.0.12 this node routable IP address
12.0.0.11 k8s master node IP address
kube-proxy Pod
On each worker node
mkdir /etc/kubernetes/manifests/
vi /etc/kubernetes/manifests/kube-proxy.yaml

apiVersion: v1
kind: Pod
metadata:
  name: kube-proxy
  namespace: kube-system
spec:
  hostNetwork: true
  containers:
  - name: kube-proxy
    image: quay.io/coreos/hyperkube:v1.2.4_coreos.1
    command:
    - /hyperkube
    - proxy
    - --master=https://12.0.0.11
    - --kubeconfig=/etc/kubernetes/worker-kubeconfig.yaml
    - --proxy-mode=iptables
    securityContext:
      privileged: true
    volumeMounts:
      - mountPath: /etc/ssl/certs
        name: "ssl-certs"
      - mountPath: /etc/kubernetes/worker-kubeconfig.yaml
        name: "kubeconfig"
        readOnly: true
      - mountPath: /etc/kubernetes/ssl
        name: "etc-kube-ssl"
        readOnly: true
  volumes:
    - name: "ssl-certs"
      hostPath:
        path: "/usr/share/ca-certificates"
    - name: "kubeconfig"
      hostPath:
        path: "/etc/kubernetes/worker-kubeconfig.yaml"
    - name: "etc-kube-ssl"
      hostPath:
        path: "/etc/kubernetes/ssl"
12.0.0.11 k8s master node
kubeconfig
Create the following YAML on each worker node to facilitate secure communication between k8s components
vi /etc/kubernetes/worker-kubeconfig.yaml

apiVersion: v1
kind: Config
clusters:
- name: local
  cluster:
    certificate-authority: /etc/kubernetes/ssl/ca.pem
users:
- name: kubelet
  user:
    client-certificate: /etc/kubernetes/ssl/worker.pem
    client-key: /etc/kubernetes/ssl/worker-key.pem
contexts:
- context:
    cluster: local
    user: kubelet
  name: kubelet-context
current-context: kubelet-context
Calico container
On each worker node
vi /etc/systemd/system/calico-node.service

[Unit]
Description=Calico node for network policy
Requires=network-online.target
After=network-online.target

[Service]
Slice=machine.slice
Environment=CALICO_DISABLE_FILE_LOGGING=true
Environment=HOSTNAME=12.0.0.12
Environment=IP=12.0.0.12
Environment=FELIX_FELIXHOSTNAME=12.0.0.12
Environment=CALICO_NETWORKING=false
Environment=NO_DEFAULT_POOLS=true
Environment=ETCD_ENDPOINTS=http://12.0.0.11:2379,http://12.0.0.12:2379,http://12.0.0.13:2379
ExecStart=/usr/bin/rkt run --inherit-env --stage1-from-dir=stage1-fly.aci \
--volume=modules,kind=host,source=/lib/modules,readOnly=false \
--mount=volume=modules,target=/lib/modules \
--trust-keys-from-https quay.io/calico/node:v0.19.0
KillMode=mixed
Restart=always
TimeoutStartSec=0

[Install]
WantedBy=multi-user.target
http://12.0.0.11:2379,http://12.0.0.12:2379,http://12.0.0.13:2379 ETCD_ENDPOINTS
12.0.0.12 this node routable IP address
Start Services
On each worker node start the following services
sudo systemctl daemon-reload
sudo systemctl start flanneld
sudo systemctl start kubelet
sudo systemctl start calico-node
Ensure they are all started on each boot
sudo systemctl enable flanneld
sudo systemctl enable kubelet
sudo systemctl enable calico-node
Check the health of the kubelet and calico systemd unit
systemctl status kubelet.service
systemctl status calico-node.service
kubectl
kubectl is the Kubernetes command line tool giving you full control of your cluster from your workstation.
installation
download the binary, for Linux
curl -LO https://storage.googleapis.com/kubernetes-release/release/$(curl -s https://storage.googleapis.com/kubernetes-release/release/stable.txt)/bin/linux/amd64/kubectl
for macOS
curl -LO https://storage.googleapis.com/kubernetes-release/release/$(curl -s https://storage.googleapis.com/kubernetes-release/release/stable.txt)/bin/darwin/amd64/kubectl
Then do
chmod +x kubectl
mv kubectl /usr/local/bin/kubectl
or if you use brew
brew install kubectl
for Windows
curl -LO https://storage.googleapis.com/kubernetes-release/release/$(curl -s https://storage.googleapis.com/kubernetes-release/release/stable.txt)/bin/windows/amd64/kubectl.exe
autocompletion
On linux
echo "source <(kubectl completion bash)" >> ~/.bashrc
On MacOS, works only if you used brew not a direct download.
brew install bash-completion
echo "source $(brew --prefix)/etc/bash_completion" >> ~/.bash_profile
echo "source <(kubectl completion bash)" >> ~/.bash_profile
Configuration
You need to share with kubectl your environment details, update below the path to your TLS certificates
kubectl config set-cluster default-cluster --server=https://12.0.0.11 --certificate-authority=/<absolute_path_to>/ca.pem
kubectl config set-credentials default-admin --certificate-authority=/<absolute_path_to>/ca.pem --client-key=/<absolute_path_to>/admin-key.pem --client-certificate=/<absolute_path_to>/admin.pem
kubectl config set-context default-system --cluster=default-cluster --user=default-admin
kubectl config use-context default-system
12.0.0.1 master node IP address
Check everything looks good
# kubectl versions
# kubectl get nodes
NAME        STATUS                     AGE
12.0.0.11   Ready,SchedulingDisabled   2h
12.0.0.12   Ready                      22m
12.0.0.13   Ready                      22m
SchedulingDisabled we configured our master node not to be part of our scheduling not to have end user containers running on our master.
Congrat, you deserve some applause !!!! Tedious isn’t it, it’s a good promotion for automation tooling like Ansible ;)
DNS Addon
This step is documented here. In our case, the DNS_SERVICE_IP is 13.0.0.10.
Each Pod will then be able to resolve containers names in the cluster.local domain. Kubelet will inject 13.0.0.10 as the resolver into each provisioned container.
But I wasn’t able to make it work, kube2sky container exit while trying to connect to master API with its service IP while the certificate were generated with another one. It’s a bit tricky to fix without having to rely on setting insecure-skip-tls-verify.
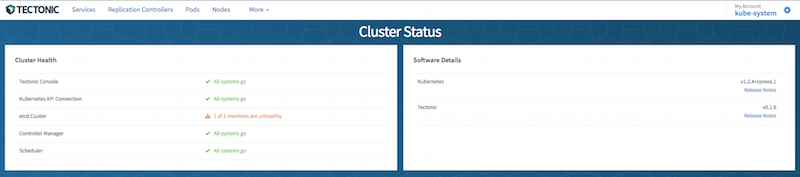
Tectonic console
![]()
We are now done for our k8s deployment, lets go on with Tectonic now.
Start by registering for a Tectonic Starter, it’s free but will give you a feature limited version. You won’t have any authentication layer or container registry. If you prefer to see the full version, you’ll have to sign up for a 30 day eval instead. Once registered for it, you’ll be able to download a Kubernetes formated pull secret from your Account Assets page. This secret specifies credentials that k8s will use to pull the image down from a container registry.
you can install the pull secret
kubectl create -f coreos-pull-secret.yml
Now download the Tectonic Manifest which defines a replication controller that pulls, runs and maintains the console container throughout its lifecycle on the k8s cluster.
Upload this manifest
kubectl create -f tectonic-console.yaml
Monitor Tectonic container status
kubectl get pods --watch -l tectonic-app=console
NAME                            READY     STATUS              RESTARTS   AGE
tectonic-console-v0.1.6-u0yzk   0/1       ContainerCreating   0          1m
After a bit you should see
NAME                            READY     STATUS    RESTARTS   AGE
tectonic-console-v0.1.6-rdtqo   1/1       Running   0          26s
Installed in 26s, nice insn’t it !!!
Since it’s a starter edition, there isn’t any authentication in place for the console, you need to use port forwarding to access it
kubectl get pods -l tectonic-app=console -o template --template="{{range.items}}{{.metadata.name}}{{end}}" | xargs -I{} kubectl port-forward {} 9000
The first part of the command above is getting the name of the tectonic console Pod, second part is forwarding local port 9000 to it.
You should now be able to access the console at http://localhost:9000
To simplify things a bit, you can also expose the console by creating a Service
vi tectonic-console-service.yml

apiVersion: v1
kind: Service
metadata:
  name: tectonic-console-public
spec:
  type: NodePort
  ports:
    - port: 9000
      nodePort: 32000
      protocol: TCP
      name: tectonic-console-expose
  selector:
    tectonic-app: console
    tectonic-component: ui
Create the service using kubectl
kubectl create -f tectonic-console-service.yml
Now you can access the console using any node IP adress on port 32000, for example http://12.0.0.12:32000
In case you want to remove it from your cluster just do
kubectl delete replicationcontrollers tectonic-console-v0.1.6
kubectl delete secrets coreos-pull-secret
kubectl delete svc tectonic-console-public
Kubernetes Dashboard
Apart from tectonic, Kubernetes offers its own native UI that you install by running the command below.
kubectl create -f https://github.com/kubernetes/dashboard/blob/master/src/deploy/kubernetes-dashboard.yaml
I’ll talk about this UI in a future article.
Simple demo
Kubernetes can be easy to use when we abstract away the YAML or the API by using instead the high level commands. Lets try the following example.
You deserve to have a little bit of fun, so lets try to deploy Nginx within our cluster.
kubectl run nginx --image=nginx:1.10
The command creates a deployment, check if the corresponding pod is running
kubectl get po
NAME                            READY     STATUS    RESTARTS   AGE
nginx-1173773998-pfw67          1/1       Running   0          10s
To get access to it easily, you can expose your deployment
kubectl expose deployment nginx --port 80 --type=NodePort
This creates a Service as you can see below
kubectl get svc
NAME                      CLUSTER-IP   EXTERNAL-IP   PORT(S)    AGE
nginx                     13.0.0.212   nodes         80/TCP     12s
Now look into your newly created service
kubectl describe svc nginx
Name:     nginx
Namespace:    default
Labels:     run=nginx
Selector:   run=nginx
Type:     NodePort
IP:     13.0.0.212
Port:     <unset> 80/TCP
NodePort:   <unset> 32613/TCP
Endpoints:    14.0.99.2:80
Session Affinity: None
No events.
You should now be able to access nginx on any worker node IP on port 80.
But you can also exec commands directly within a selected the container
kubectl exec -ti nginx-1173773998-pfw67 -- bash
To clean your environment do
kubectl delete deployment nginx
kubectl delete svc nginx
Troubleshooting
You can’t install anything on a CoreOS machine but you can start a toolbox which is a priviledged container running a Fedora distribution like this
/usr/bin/toolbox
Wait until it downloads the image and launch the corresponding container, you can then install troubleshooting tools like this
yum install iputils
yum install net-tools
yum install tcpdump
To troubleshoot within a busybox container you can run
kubectl run -i --tty busybox --image=busybox --restart=Never -- sh
Conclusion
Wow, it was a long, long process, but it’s a good learning experience to better understand all the moving parts involved in Kubernetes. If you see another version of k8s and want to upgrade, look at the following documentation.
If you want to play with your cluster, you can now try to deploy the Guestbook example application.
Good Luck !!!
Links
- CoreOS Docs
- CoreOS Cluster Architecture
- CoreOS Clustering Guide
- CoreOS Cloud Config Docs
- CoreOS Cloud Config Validator
- CoreOS Troubleshooting
- CoreOS on VMware
- CoreOS VMware KB
- CoreOS VMware Community Forum
- Tectonic Docs
- OpenStack on k8s - Stackanetes