In this article we will review all the steps required to deploy NSX 4.0 a Network Virtualisation offering from VMware. We will nest this lab within an OpenStack cloud but you can run the lab anywhere else where you can launch VMs, including vSphere, Virtual Box or VMware Fusion.
OpenStack Networking
In our environment each kvm VM will be connected to distinct networks using different virtual interfaces. We first have to create four logical networks within our OpenStack cloud. It’s a funny exercice to deploy NSX nested inside NSX !
-
Connect to your OpenStack Horizon dashboard.
-
Create the following networks, be sure to leave Gateway unconfigured and DHCP unchecked.
Network name Subnet CorpNAT 192.168.1.0/24 Management 10.0.0.0/24 transport-1 10.10.1.0/24 transport-2 10.10.2.0/24 -
Create a logical router to connect
CorpNATnetwork to the external world -
Create a logical router to connect both transport networks together
Note: If you’re using another environment, like VMware fusion 6.0, you can use custom networks to get the same result. Go to VMware Fusion > Preferences > Network to create them. transport-2 is optional but demonstrate that L2 networks can span multiple networks easily with NSX. If you prefer you can connect all your hypervisor to the same transport network.
IP Addressing
For reference you’ll find below all the IP addressing of our VMs on the different networks:
|Instance name|CorpNat|NSX Management|Floating IP|Transport-1| |:-|:-| |NSX Controller|192.168.1.18|10.0.0.5|10.36.1.220|| |NSX Manager|192.168.1.13|10.0.0.3|10.36.1.200|| |NSX Service Node|192.168.1.14|10.0.0.4|10.36.1.221|10.10.1.2| |NSX Gateway|192.168.1.15|10.0.0.6|10.36.1.215|10.10.1.4| |ubuntu-1204-01|192.168.1.16|10.0.0.9|10.36.1.217|10.10.1.7| |ubuntu-1204-02|192.168.1.17|10.0.0.10|10.36.1.222|10.10.1.8|
NSX Controllers
The NVP Controllers Cluster is a cluster of x86 servers offering: massive scalability and full fault-tolerance. They manage the edge switching components within an NSX domain.
-
Within your OpenStack Cloud (or your selected virtual environment), launch up to three instances of NSX-Controller-4.x connected to
CorpNATandManagementnetworks. We will deploy only one here which is self-sufficient for a demo. -
Associate a floating IP to each of them.
-
Run the following commands on your instances, default
login/passwordisadmin/admin:ssh admin@controller-floatingIP set hostname nsx-controller-<Instance#> add network ntp-server 0.pool.ntp.org set network interface breth0 ip config static <mgt-network-ip>.x 255.255.255.0 show network interface set control-cluster management-address <controller-mgtIPaddress> set control-cluster role api_provider listen-ip <controllerIP-mgtIPaddress> set control-cluster role switch_manager listen-ip <controllerIP-mgtIPaddress> join control-cluster <controllerIP-mgtIPaddress> show control-cluster startup-nodes show control-cluster status
Note: When you’ll join the second or third node to the cluster use the first controllerIP-mgt-address. When joining, if you get the error below, it’s the remaining of a previous join operation. You then need to delete the old UUID from the Controller Cluster using the DELETE /ws.v1/control-cluster/node/<old_uuid> API method to clear the state.
Could not join cluster, because a different node with this node's management address is already part of the cluster
NSX Manager
The NSX Manager a web based interface that provides user-friendly method to interact with the NSX API. But it’s not meant for day to day provisioning or automated configuration. Lets deploy it now.
-
Within your OpenStack Cloud, launch an instance of NSX-Manager-4.x connected to
CorpNATandManagementnetworks. -
Associate a floating IP to it.
-
Run the following commands, default
login/passwordisadmin/admin:ssh admin@manager-floatingIP set hostname nsx-manager show network dns-server add network dns-server 8.8.8.8 [only needed if setup is empty] add network ntp-server 0.pool.ntp.org set network interface breth0 ip config static <mgt-network-ip>.x 255.255.255.0 -
Connect to the Manager WebUI at
http://manager-floatingIPwithadmin/admincredentials -
Click
Add Clusterand complete the wizard with the following inputsHost = <controllerIP-mgtIPaddress> Username = admin Password = admin -
Create a
Transport Zone, it’s a collection of OVS devices that can communicate with each other.- To do that Click on Network Components > Transport Layer > Transport Zone.
- Click Add
- Choose any Transport Zone name, that doesn’t really matter.
NSX Gateway
The NSX Gateway will provide external connectivity to our workloads that are connected to NSX logical networks. Our OpenStack environment provides PXE boot facility. We will use this facility to provision the NSX Gateway as instructed below. If you have issues PXE booting within OpenStack, make sure your default security group allows UDP/69 traffic.
-
Launch a PXE instance within your OpenStack Cloud. It’s just an instance that can boot from PXE. It needs to be connected to
corpNAT,Managementandtransport-1networks. At the PXE boot prompt type the trigger to boot and install the NSX Gateway 4.0 latest release. Consult your cloud administrator to get the same kind of information for your own PXE environment or use the NSX Gateway ISO available on the VMware support site (credentials required).gateway-sr87-latest -
Wait a while and assign floating IP to access it remotely to type the following commands.
ssh admin@gateway-floatingIP set hostname nsx-gateway add network ntp-server 0.pool.ntp.org show network interface set network interface breth0 ip config static <mgt-network-ip>.x 255.255.255.0 set network interface breth1 ip config static <transport-network>.x 255.255.255.0 add network route 10.10.0.0 255.255.0.0 <network-data1>.1 [needed because communication with other hypervisors on other L2 should happen on the transport network] show network routes add switch manager <controllerIP-nsx-mgt> -
Connect to the Manager WebUI at
http://manager-floatingIPwithadmin/admincredentials to create a Gateway Node API Entitya. Click
Add > Connect to Transport Nodein the Gateway Node Row in the Summary of Transport Components section
b. Enter Host IP = servicenode-mgtIPaddress
c. Username & Password =admin/admin
d. ClickConnect
e. ClickConfigure
f. Enter Display Name ofnsx-gateway-01
g. ClickSave & Viewto create the Gateway API Entity -
Check Service Node Status from Manager GUI, it should display
Management Connection up OpenFlow Connection up admin status enabled -
Edit the Gateway API Entity to Add a Transport Connector with the following settings
Transport Type: STT Transport Zone UUID: demo-zone IP Address: 10.10.1.4 -
Check Service Node Status, from an SSH connection type
show switch managers -
Now we’ll create a L3 Gateway Services to connect logical ports to external, physical networks. Click
Addin the Gateway Services row of the NSX Manager Dashboard. And complete the wizard withGateway Service Type: L3 Gateway Service Display name: l3-gws Add Gateway: nsx-gateway-01 Device ID: breth2 [device connected to the outside world] Click `Save & View` to create the Gateway Service
Service Node
Service Node offloads task of packet replication from hypervisor CPU for L2 Broadcast, Unknown unicast and Multicast (BUM). We will use the same methodology as the one for the Gateway to provision this node using PXE boot.
-
launching another PXE instance connected to
corpNAT,Managementandtransport-1Networks. Our PXE environment use the following pattern for PXE images:<node-type>-<releasecodename>-<buildnumber><node-type>could be equal tocontroller,manager,service-node,gateway
sr87is the releasecodename for the 4.0 branch.
<buildnumber>is latest if you want the greatest working build.
In summary, if you want the latest 4.0 release you can simply typeservicenode-sr87-latestat the PXE prompt or boot from an ISO if you don’t have any PXE server configured with NSX images. -
After a while you’ll get your shiny new instance ready to rock. From the OpenStack dashboard, associate a floating IP to it.
-
Run the following commands, default
login/passwordisadmin/admin:ssh admin@servicenode-floatingIP set hostname nsx-servicenode add network ntp-server 0.pool.ntp.org show network interface set network interface breth2 ip config static <mgt-network-ip>.x 255.255.255.0 set network interface breth0 ip config static <transport-network>.x 255.255.255.0 add network route 10.10.0.0 255.255.0.0 <network-data1>.1 [needed because communication with other hypervisors on other L2 should happen on the transport network] show network routes add switch manager <controllerIP-nsx-mgt> -
Now to create the Service Node API Entity we will use a manual process this time for learning purpose. First connect to the Manager WebUI at
http://manager-floatingIPwithadmin/admincredentials
a. ClickAddin the Service Node Row in Summary of Transport Components section
b. Leave all default except as instructed below
c. Transport Node Type:Service Node
d. Display Name:nsx-servicenode-1
e. Get SSL certification from Service Node using:show switch certificate
f. Paste SSL certificate in Security Certificate textbox
g. ClickAdd Connector, to add a Transport Connector
h. Transport Type:STT
i. Transport Zone UUID: only one available here
j. IP Address:<network-data1>.5adapt to your environment, it’s the IP address of the Service Node on the transport Network.
k. ClickSave & Viewto create the Service Node API entity -
Check Service Node Status from Manager GUI, it should display
Management Connection up, OpenFlow Connection up an Admin status enabled. -
Check Service Node Status from SSH
show switch managers
Note: Each controller node should have a management connection to the Service Node. And starting with NVP 3.x, Service Node has an OpenFlow to two controller nodes, a master and its backup.
Hypervisor installation & configuration
In this Lab we will use kvm, in a future post we’ll connect other hypervisor to our NSX Domain. NSX 4.0 currently support KVM and XEN hypervisors but already works in beta with vSphere ESXi hosts.
-
Within your OpenStack Cloud, launch two instances of Ubuntu-12.04-Server connected to
CorpNAT,Managementandtransport-1, in that specific order. If you’ve createdtransport-2, you can connect the second node to this network instead. -
Associate a floating IP to your instance
-
Make sure you activate Mac Learning for them. It will allow to have other Mac Address behing the connected Nics. To do that just click within the Horizon Dashboard on
Manage Networks > Networks > Ports > Edit Portand activate Mac Learning in the Popup window. -
From Ubuntu-1204 OpenStack VNC Console update the
/etc/network/interfaceswith the following content, This file will be modified later when we will install Open vSwitch to add a Bridge Interface (br0):auto lo iface lo inet loopback auto eth0 eth1 eth2 iface eth2 inet static address 10.0.0.9 netmask 255.255.255.0 network 10.0.0.0 broadcast 10.0.0.255 iface eth1 inet static address 10.10.1.7 netmask 255.255.255.0 netmork 10.10.1.0 broadcast 10.10.1.255 iface eth0 inet static address 192.168.1.16 netmask 255.255.255.0 netmork 192.168.1.0 broadcast 192.168.1.255 dns-nameservers 8.8.8.8 gateway 192.168.1.1 -
SSH to your instance
ssh nicira@ubuntu-floating-ip (password: nicira) -
Run the following commands on the Ubuntu VM to install KVM on the node:
sudo apt-get update sudo apt-get upgrade sudo apt-get install dkms libssl0.9.8 python-argparse sudo apt-get install qemu-kvm libvirt-bin virinst -
You can now transfer and install OVS package to your nodes:
scp nvp-ovs-x.x.x-buildxxxxx-ubuntu_amd64.tar.gz username@ubuntu-floating-ip: tar –xvf nvp-ovs-x.x.x-buildxxxxx-ubuntu_amd64.tar.gz -
Install the Open vSwitch kernel module package
sudo dpkg -i openvswitch-datapath-dkms*.deb -
Install the Open vSwitch userspace packages
sudo dpkg -i openvswitch-common*.deb openvswitch-switch*.deb -
Install the nicira-ovs-hypervisor-node package, it will create the
br-intintegration bridge and the SSL credentials (OVS client certif & private key) to securely authenticate this hypervisor to the NSX Controller Cluster.sudo dpkg -i nicira-ovs-hypervisor-node*.deb -
Check
br-intnow existifconfig -a -
Install tcpdump-ovs package which provides the tcpdump-ovs utility that can be used to look inside overlay tunnels.
sudo dpkg -i tcpdump-ovs_4.1.1.ovs2.0.1.31683_amd64.deb -
Install the NSX Logical port statistics exporter dependencies
apt-get install libc6 libgcc1 libgcc1 libprotobuf7 libssl1.0.0 libstdc++6 libzmq1 daemon -
Two packages require you to add the following repository to
/etc/apt/sources.listdeb http://security.ubuntu.com/ubuntu quantal-security main universe -
You have to refresh the package database with
apt-get update -
Install the last two packages
apt-get install libboost-program-options1.49.0 libboost-system1.49.0 -
Now that you’ve pulled these package from Quantal, I recommend you remove this repository to avoid any dependency hell.
-
You can now install the Logical port statistics exporter
cd nicira-flow-stats-exporter/ dpkg -i nicira-flow-stats-exporter_4.0.1.30164_amd64.deb -
Check you can ping other instance on the Management network
ping -c 3 <gateway-management-ip>
Libvirt upgrade
Ubuntu 12.04 comes with Libvirtd 0.9.8 which is far from optimal when it comes to Open vSwitch support. Lets use the Canonical Cloud Archive to upgrade to a newer version.
-
Type the following command to add the corresponding repository.
sudo apt-get install python-software-properties sudo add-apt-repository cloud-archive:havana sudo apt-get update -
You can now upgrade Libvirt
apt-get install libvirt-bin -
Check your installed version
libvirtd -v
Open vSwitch configuration
To configure Open vSwitch on your hosts, do the following on each of your hypervisor
-
Create OVS Bridges for each NIC or Bond:
ovs-vsctl add-br br0 ovs-vsctl br-set-external-id br0 bridge-id br0 ovs-vsctl set Bridge br0 fail-mode=standalone ovs-vsctl add-port br0 eth1 [use the Nic on the Transport network] -
Edit your
/etc/network/interfacesfile to add br0 and to move there the IP address previously associated with eth1:auto lo iface lo inet loopback auto eth0 eth1 eth2 br0 iface eth1 inet manual pre-up ifconfig $IFACE up post-down ifconfig $IFACE down iface eth0 inet static address 10.0.0.9 netmask 255.255.255.0 network 10.0.0.0 broadcast 10.0.0.255 iface br0 inet static address 10.10.1.7 netmask 255.255.255.0 network 10.10.1.0 broadcast 10.10.1.255 iface eth2 inet static address 192.168.1.16 netmask 255.255.255.0 network 192.168.1.0 broadcast 192.168.1.255 dns-nameservers 8.8.8.8 gateway 192.168.1.1 -
Configure the NSX Controller Cluster IP Address
ovs-vsctl set-manager ssl:<controllerIP> -
Almost there, you can look at your SSL Credentials for the OVS Management Connection
cat /etc/openvswitch/ovsclient-cert.pem -
And check the Bridge-ID associated with the Integration Bridge
ovs-vsctl br-get-external-id br-int bridge-id
Keep these information on hand, you’ll need it in the next step.
Create Transport Node API Entities for your Hypervisors
Now that you’ve prepared your hypervisors for NSX, you have to create the corresponding API Entities.
-
Click
Addin the Hypervisors row of the NSX Manager UI -
Click
Nextand complete the Wizard with the following detailsIntegration Bridge ID: br-int Security Certificate: see /etc/openvswitch/ovsclient-cert.pem -
Before saving it, you need to Add a Connector with the following details:
Transport Type: STT Transport Zone UUID: should be already there IP Address: 10.10.1.7 [IP Address of the hypervisor on the Transport Network] -
Now you can click on
Save & View -
Hypervisor status should be green at this stage. If it’s not the case check again that
openvswitch-switchservice is running on your hypervisorservice openvswitch-switch status
Provision VMs
To provision easily a VM on our Ubuntu 12.04 Hypervisors, we can use a Canonical tool called vmbuilder.
-
install
vmbuilderwithsudo apt-get install python-vm-builder -
You can now create a new VM like this
cd /home/nicira sudo vmbuilder kvm ubuntu --suite precise --flavour virtual --arch i386 -o \ --libvirt qemu:///system \ --ip 172.16.10.2 \ --hostname u1.lab.int \ --bridge br-int -
Because we’ve added a
--libvirtargument, your VM is already registered with kvm, check it withvirsh 'list --all'
Repeat this process for each hypervisor with obviously another IP address and hostname.
Configure Libvirt
Before starting your VMs, you have to instruct Libvirt to always connect VMs network interfaces to the Open vSwitch Bridges.
-
Edit the VM configuration with
virsh edit ubuntu -
find the
<interface>block for each interface that you want to attach to the OVS bridge and edit its<virtualport>block like this#!xml ... <interface type='bridge'> <mac address='52:54:00:d0:3f:f2'/> <source bridge='br-int'/> <virtualport type='openvswitch' /> <address type='pci' domain='0x0000' bus='0x00' slot='0x03' function='0x0'/> </interface> ... -
You can now start all the modified VMs
virsh start ubuntu
Starting & Accessing VMs remotely
We don’t network connectivity to the VMs yet, so lets configure a way to access them. By default, the first Guest is accessible on vnc:127.0.0.1:5900.
-
To access the VNC console remotely you can create an SSH tunnel, on your workstation type
ssh userid@hypervisor-floating-ip -L5900:localhost:5900 -
You can now use a VNC client to connect to
localhost:5900. Defaultlogin/passwordisubuntu/ubuntu. -
While you are connected to your VM, make sure you setup the default gateway in the
/etc/network/interfacesfile like this:auto lo iface lo inet loopback # The primary network interface auto eth0 iface eth0 inet static address 172.16.10.3 netmask 255.255.255.0 network 172.16.10.0 broadcast 172.16.10.255 gateway 172.16.10.1
Adding Ports to the OVS Integration Bridge
This lab is already big enough, so we’ll keep the Cloud Management Platform integration with OpenStack or CloudStack for another time. With the latest version of Libvirt which is 1.1.1 at this time, as soon as you’ve updated the VM XML with the Open vSwitch bridge and restarted the VM, you should be good to go in terms of KVM integration.
Create a Logical Switch and Logical Ports
The last thing we need to do for the VMs to be able to pings themselves is to create the Logical Switches and Logical Ports to connect the VM together. Lets do that now.
-
Get back to the NSX Manager Dashboard and click on
Addin the Switches Column and Complete the Wizard withDisplay Name: LS-172 Add a Transport Zone Binding using your Transport Zone and STT as the Transport Type Don't select any Logical Router for now. -
Get back to the NSX Manager Dashboard and click on
Addin the Switches Ports column and complete the Wizard with (repeat this process for each VM)Logical Switch UUID: should already be selected. Display Name: ubuntu-01 & ubuntu-02 for the second port Attachement Type: VIF Hypervisor: ubuntu-1204-01 & ubuntu-1204-02 for the second port VIF: vnet0 -
Click Save & View
-
Fabric, Link and Admin Status should be green.

If you have only green lights, like in the screenshot above, you should be able from one VM to ping the other one with great success.
Congratulation for reaching this stage of the lab. It was a long way but seeing the ping flowing should give you at least a little joy ;)
If it’s not the case, consider you’re lucky, you now have an opportunity to learn more from our Troubleshooting section at the bottom of this page.
Add a Logical Router
We are almost done, we just have one last step to achieve before we go. Our VMs can ping each others but we still don’t give them external access. Like in the physical world, we need a router to allow them to get out of their subnet.
This is exactly what we’ll do in this step, we’ll add a logical router to our setup and connect it to our Logical Switch.
The one thing which is great with NSX is to keep the same kind of workflow: connect a VM to a Switch and then connect the switch to a router, that will still resonate with Network Engineers. We change the way we implement networking but we don’t change all the laws of networking.
-
Connect back to the NSX Manager Dashboard and click
Addin the Routers column of the NSX Management Dashboard and complete the wizard withDisplay Name: router-192 Routing Type: Single Default Route Default Gateway IP Address: 192.168.1.1 [physical Uplink router IP address] Distributed Logical Router: tick this checkbox L3 Gateway Service: l3-gws IP Addresses: 192.168.1.254 [IP addresses exposed by the router to the physical network] Click `Save & View` to create the Logical Router -
To attach this logical router to our Logical Switch, click
Addin the Router Ports column of the NSX Management Dashboard and complete the wizard withLogical Router UUID: router-192 Display Name: lr192-ls172-patch IP Addresses: 172.16.10.1/24 [will be the default GW for our two VMs] Attachment Type: Patch Logical Switch UUID: ls-172 Peer Port UUID: Create one with Display Name of ls172-lr192-patch and Attachment Type None -
You can now try to Ping the router from the nested VMs
ping 172.16.10.1 -
To ping further away you need to setup a Source NAT rule. Reach the NAT Rules section of your Logical Router to Add the following rule:
Type: Source Min Source IP Address: 192.168.1.254 Max Source IP Address: 192.168.1.254 Ethertype: IPv4 Source IP Addresses: 172.16.0.0/16 -
Now from your nested VM, you should be able to ping an external IP Adresses
 ping 192.168.1.1
 ping 8.8.8.8
Important Note : If you run this lab nested in an OpenStack/NSX environment like I do, make sure you enable Mac Learning for the NSX Gateways and Hypervisor VMs to allow Mac addresses setup on Bridges to be learnt by the undercloud NSX.
Troubleshooting
We are sorry to find you here but when things are broken it’s the best time to learn the gory details isn’t it ?
In this section we’ll review some troubleshooting tools, but there are plenty of other ways to investigate, please refer to the Troubleshooting section of the NSX documentation for all the details.
Please find here some stuff to check in case you got some red lights.
- If Admin and Link are green, but Fabric is red, ensure that the Service Node is in the correct Transport Zone
- If Admin is green, but Link and Fabric are red, Has the correct VIF Attachment been specified ?, Is the VM powered on ?, Is the VM on the Integration Bridge ?
To troubleshoot the Transport Network, NSX Manager provides the Port Connections tool.
To access it click on Tools & Troubleshooting > Port Connections and select the Logical Switch and Ports you created earlier.
Click Go to see a nice drawing about where things are broken.
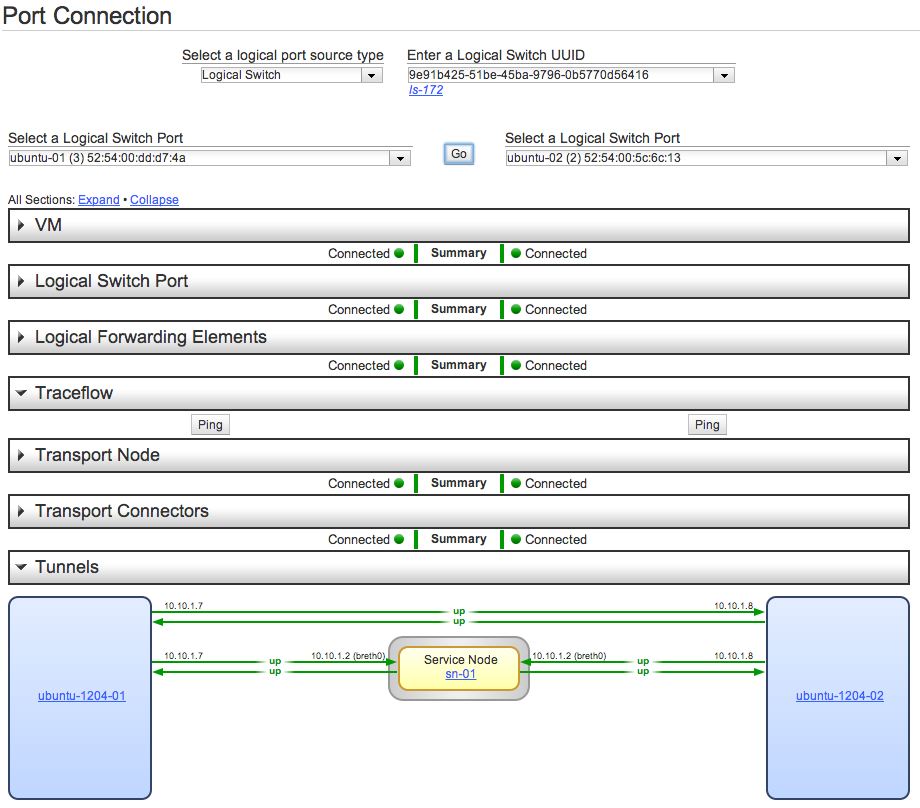
You can also use the Traceflow feature to inject Ping and test connectivity between Ports.

That should solve most of the cases, but you can investigate further.
SSH to your hypervisor and check that ovsdb-server and ovs-vswitchd are running
service openvswitch-switch status
Confirm that Open vSwitch kernel module is loaded
lsmod | grep openvswitch
Have a look to your Open vSwitch Database content
ovs-vsctl show
Check if you have all the bridges required (br-int, br0)
ovs-vsctl list-br
or
ovs-vsctl list bridge [for more details]
List all the Ports connected to the integration bridge
ovs-vsctl list-ports br-int
or to get more details
ovs-vsctl list port
You can get the specifics about the Port of a KVM VM
ovs-vsctl list port vnet0
What flows has the controller pushed down to the bridge?
ovs-ofctl dump-flows br-int
You can filter on specific Mac Addresses
ovs-ofctl dump-flows br-int dl_dst=56:5c:ca:dc:61:63
What’s happening right now on the bridge? [DP = Datapath]
ovs-dpctl dump-flows
To view tx and rx packet statistics and error/drop counters
ovs-dpctl -s show ovs-system
Apart from ovs-vsctl, ovs-ofctl or ovs-dpctl tools, VMware NSX also brings tcpdump-ovs that can be used to really deep dive into what’s happening between your hypervisors. This tool is great because it will show you what’s happening inside the tunnels.
tcpdump-ovs -i br0 port not ssh
NSX CLI gives you another tool to watch traffic from the NSX Nodes. Here are some examples from the documentation.
watch network interface breth0 traffic
watch network interface breth0 traffic icmp
watch network interface breth1 traffic 'src 10.10.1.10 and port 7471'
Conclusion
We are now done, it was a great adventure, I hope you enjoyed it as much as I did. NSX for Multihypervisor is really a great software, already used in production by enterprises like Rackspace, Paypal, schuberg philis, ATT, NTT.
But it’s not the only of its kind, VMware also offers a version customised for the vSphere stack which brings many great features like: Distributed Firewall, Load Balancing, SSL VPN,…
You can try it on the Hands on Lab environment, the corresponding lab name is HOL-SDC-1303, it’s completely free to register, once logged you’ll get four hours to complete it but you can start over at any module without have to redo everything.
If you want to clean things up a bit before you go, you can purge the runnings nested VMs like this
virsh destroy ubuntu
Or if the VM isn’t running
virsh undefine ubuntu
Happy New Year 2014 to all !!!
Links
- NSX Design Guide
- Scott Lowe excellent NSX blog posts
- Official KVM page
- Ubuntu KVM wiki
- list of KVM Management Tools
- official libvirt page
- Managing Virtualization with Virsh